Monday, September 12, 2016

Using TUHUND POS system to simplify across the counter sales

TUHUND POS is currently one of the best software programs available on the market, for billing, order taking, accounting, and to analyze inventory levels on an item-by-item basis.

TUHUND POS is a front end interface, for counter sales, of the main TUHUND ERP. It is totally integrated with ERP. The moment there is a transaction recorded in the POS, it is reflected everywhere till the balance sheet. As of now there are two distinct interfaces available; one is ideally suited for the retail industry like a supermarket chain or a small shop and the second for touch screen counters like restaurants and fast food joints. The software automatically takes the correct interface depending on the business that the branch is into. Same organization may have different businesses for different companies and branches. TUHUND POS will take the correct interface for each branch.

TUHUND POS is not affected by the connection problems as it keeps working seamlessly even when the connection is down.

You can even control inventory right at the cash register with point-of-sale (POS) software systems. TUHUND’s POS software records each sale when it happens, so your inventory records are always up-to-date. You get much more information about the sale than you could gather with a manual system. By running reports based on this information, you can make better decisions about ordering and merchandising.

TUHUND - Retail POS

TUHUND’s POS systems enable you to use multiple devices at your checkout stations, including EDC machine, bar-code scanners, and receipt or invoice printers. It is integrated with the ERP which leads to manage accounting modules, including general ledger, accounts receivable, accounts payable, purchasing, and inventory control systems. To put it in simple words TUHUND’s POS system is an all-in-one Solution to keep track of your day to day business.

Why? TUHUND’s POS:


  1. User-friendly, simple and more effective graphical interface with easy functionalities.
  2. TUHUND POS works in both online and offline mode. When there is no connectivity, TUHUND POS will just keep working. When the connection is restored, it will synchronize the data automatically.
  3. Product could be entered manually, automatically or by using bar – code scanner.
  4. Once the product information is entered system will compute the price at multiple quantities and provide a grand total.
  5. It is linked with TUHUND ERP, which makes it easier to keep track on accounting and invoicing.
  6. You can set discounts based on the hierarchy like staff -10%, Managers 20 % etc…
  7. You can analyze Business Reports, which will help your business improve day to day
TUHUND - Retail POS


Reports available on POS also include sales, costs, and profits by individual inventory items, by salesperson, or by category for the day, month and year to date. You can also create invoices, accounting statements and price tags.  You can add n numbers of price maps, and select branch applicability. 

How does it work?

TUHUND’s POS works in a smart way, when you do installation in your system It will prompt that server has not been set, and ask if you would like to set it now. Click on yes and enter URL of the customers TUHUND deployment along with protocol https:// for instance https://erp.e-centric.net
After server has been set, software will prompt "Before using the software you need to configure settings. Do you want to configure now?"

Say YES!!!

It will popup login screen, Login with your user account. Next, if the customer has multiple branches, means system will ask you to select the branch where the software is being installed. Click on the correct branch. Next the system will ask to select the station number. Click on 1 if no station has been installed in the same branch. Otherwise click on the next number. Once number is assigned. Software will close. Launch it again and work normally.

TUHUND - Restaurant POS


Auto Invoicing and Auto Completion of Commercial Invoices is one more super cool feature comes along with the TUHUND ERP system. TUHUND’s Integrated POS system is a powerful tool for kind of retails and restaurants to manage day to day sales hassle free.

Friday, August 26, 2016

Embedding TUHUND Contact Forms in other Portals and Third Party Websites

For any business, it is important to handle inbound contact queries is a seamless yet structured way. These queries could be trade enquiries or offers that could translate to business. Having a “contact us” page or form on company website is very common and there already is a way to handle it. Your website developer does not charge anything extra for this form. It is already very simple and there seems to be little scope of improving it further. The trouble starts after receiving a query. Normally these queries are forwarded to the organization through an email and emails are not that simple to manage inherently. Who should receive this email? What would be the action or actions that he would be required to take? What is the time limit? How should he respond? Who will approve the response? What if he does not handle it as required? Who is tracking these queries and how? What data is available for analysis and how? These are just a few concerns that will always be there.

Like most other issues, Tuhund has a solution for this too. Tuhund lets you create any number of contact forms which can be embedded in any website. There are several ways of embedding. Once embedded, the form opens in the website where it has been embedded and once a visitor fills in a form and submits, it is automatically recorded in Tuhund. Every form can be assigned to any user, employee or designation for handling and the users handling it as well as the managers have the option to choose how they would like to be notified. They can choose one or any combination from Notifier, Email, SMS or message in their Tuhund ERP home page. From there on it will be handled in most structured way like every other module in Tuhund. In the list page you can search, sort, filter in lot of ways besides there are BI reports for analysis. You may also choose to auto-notify the sender through email and/or SMS.

So, how does it Work?

It works in a simple way. All you need to do is to create a form and specify the fields that are required in two easy steps. Contact forms sub-module is inside the CRM module.

TUHUND - CRM Module

When you click on contact forms icon, system will display main page where you can see the list of messages received so far. On the right top right corner you will find a Manage Button, you must click on the button, and then it will take you to the next page where you can manage the contact forms. To create a new form, click on the “Add” button. Specify a distinct, easily identifiable name for the form which will be used for internal reference. Specify the form heading. Form heading will be displayed on top of the contact form created. Finally choose the fields from the pre-specified list, Name, Company, Email, Mobile, Phone and Subject to specify which fields are required and which ones are mandatory to be filled in. Finally specify width and height of the form in pixels and save. System will automatically generate embedding code of contact form based on the attributes and information you gave before saving it.

TUHUND - Contact Form

You can find the HTML embed code at the bottom of the page below the preview of the form. Preview form is fully functional. That means, you can use it for testing. You can also edit the details of the fields if something is wrong. Any number and types of custom fields can be added. Some might have multiple portals you can use the same contact form or you can create the new one. Also, you can embed it to the third party website; if you have a blog or something hosted by some other site you can use the contact form code to display it there.      

TUHUND - Contact Form HTML Code

Now, where can I find the messages?

All the messages that you receive will be stored in the CONTACT FORM MESSAGES, when you click on the icon, it will take you to the main page where you can see the list of messages that have come.  You can see the Contact details and read the subject line of the message from the main page itself, if you click on the message it will show complete details of the message and also you will see more options, you can compose a mail directly from the same page, you can see the past history below. And on the right top, you will see CLOSE button if you click on that, system will close the message, it will not show on the page unless you filter your search. You can search previous messages by refining your search filter.

TUHUND - Contact Form Messages

The best thing about TUHUND's Contact form messages is, it could be linked with your mobile number also to your mailbox via ERP, so that every time you get a new message you will receive an  alert to your mobile number and to your mailbox. You can do this settings in admin control panel by changing the security functions.

Isn’t so cool?  If you are really focused on the growth of your business TUHUND’s Contact Form is an extraordinary tool for you to build a good customer relationship to your business.


Thursday, August 25, 2016

Implementation Procedure - Support For TUHUND Implementation Partners

This post comprises a few selected parts of the TUHUND deployment and implementation methodology document. Though, implementation partners are given a full detailed guide along with formal training and maximum real time support, this post is to just give a brief idea of the process to the prospective partners. TUHUND deployment and implementation is very simple and quick. It assures high returns for the partners.
Lifecycle phases of TUHUND deployment and implementation methodology are as follows:
  1. Technical deployment
  2. Data entry
  3. System configuration and tuning
  4. Training
  5. Signoff
Please note: Technical lifetime support to all direct and indirect customers is provided by ECS Business Software Solutions through inbuilt support ticket system.
Normally only the first phase is accomplished in one go. Phases 2 to 5 go through several iterations.
Technical deployment steps are as follows:

  1. Project formal start
  2. Procurement of TUHUND License for the buyer
  3. Hardware deployment
  4. Installation of RHEL 5.4 or higher (or Solaris)
  5. Network configuration
  6. Procurement and configuration of domains. Domain for ERP is mandatory while domains for customer sub-portal and recruitment sub-portal are optional
  7. Procurement and installation of secure server certificate (SSL)
  8. Install of Database Software
  9. Import blank TUHUND database
  10. Install JAVA and Apache Tomcat application server
  11. Install TUHUND License and scripts
  12. Run TUHUND auto update script
  13. Configure schedulers (crontab)

That’s it. System is up and running with latest TUHUND software. Sign off from the Technical Deployment.http://www.tuhund.com/http://www.tuhund.com/

Two users with administrative access will be auto-created by the system and the credentials of one will be given along with the license. Other user access will be reserved for TUHUND support team access till deployment is complete. These two users will not be counted in TUHUND user licenses.
For data entry TUHUND recommends two diverse methodologies for the implementation.


The partner will have to select the correct methodology first, which can be any one or a combination of the two. The partner must then go through it thoroughly and explain the pros and cons of both the methodologies while negotiating the same with the customer. The selection must be made in real time considering the factors including but not limited to the following:

  1. Nature of the organization and its geographic diversity.
  2. Current processes and maturity of the current processes.
  3. Current system or systems being used by the customer.
  4. Data export capability of the current systems to excel, CSV, xml formats.
  5. Involvement of the top management for leadership role.
  6. Number and authority level of the customer’s resources dedicated for the implementation project.
  7. Level of customization required that is mandatory before go live.

The partner is advised to put the methodology on paper and sign off with the customer so that customer expectations can be managed.

IMPORTANT: Please be advised, there can be a major problem with turnkey implementation due to the fact that all the departments in the customer's organization are highly inter-dependent on each other. If any department withholds the approval and / or their part of work, entire system comes to a halt.

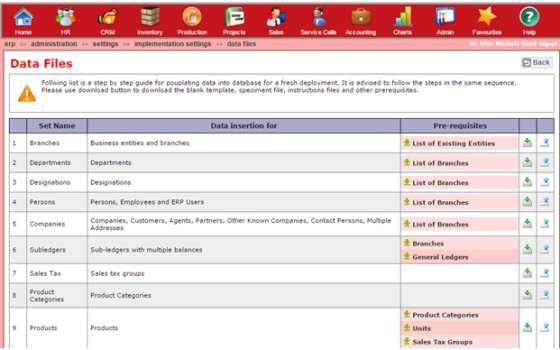
For both types of implementation latest versions of sets of data templates, instructions and sample files together with pre-requisites can be downloaded through the implementer control panel and the populated files can also be uploaded in the same panel for population of data.
TUHUND - Implementer Control Panel


Now, let’s have a look at the Implementation Workflow, in both the methodologies recommended sequence of data entry is as follows:

You can start with the Data Entry as follow, however the data entry is quite a long procedure but kind of interesting when you start doing it. You can start by entering:

  • Entity and branch data
  • Departments and positions data
  • Employee and ERP user data

Once you enter the ERP user data Next step is to configure the user’s access rights, so you will start with creation of security groups with appropriate security rights in each group. Neither groups nor rights are mutually exclusive. Which mean, one user can be in any number of security groups and one access right can also be in any number of security groups. Thus any given user can have multiple roles and responsibilities. Assign security groups and branch level access to each user. To make it simple you can work both ways; that is for a particular user you can choose the branches or you can go to a branch and choose users who have access to that branch. Similarly you can select security groups for a user or go to a security group and select the users in that group.

  • Configure email servers and accounts
  • Configure SMS API
  • Configure user alerts and notifications
  • Configure approval rules and workflows
  • Notify users about their login ids and passwords

After configuration of users next procedure is to

  • Create customer groups
  • Create marketing zones
  • Enter Customers, vendors and partners data

Then the next big thing is to set up accounting and finance module, so you will start with

  • General ledgers tuning
  • Entry of sub-ledgers and opening balances
  • Configure smart accounts
  • Create and configure transaction vouchers
  • Create and configure accounting forms
  • Configure currencies and exchange rates or exchange rate auto-update correction factors
  • Create sales tax, service tax, GST, excise duty, secondary tax, add on tax (like nation building tax, suspended vat and zakat, etc) groups, whichever required.
  • After accounting, Next step is to:
  • Create product categories
  • Configure sales units
  • Products data entry
  • Create service types
  • Configure service units
  • Services data entry
  • Once all the product and services data is entered you can start with
  • Creating quotation types and rules
  • Create proforma invoice types and rules
  • Create commercial invoice types and rules
  • Create and configure price maps, price lists and rules
  • Create lead referrers and categories
  • Enter existing business leads
  • Create event types and required fields
  • Enter customer and lead events
  • Enter open customer and lead reminders

After this, you can move on to Inventory module and start

  • Creating stores
  • Enter inventory
  • Configure purchase order types
  • Enter purchase orders
  • Enter invoices

Then you can set up this rest of the requirement in phases:

  • Configure project types
  • Enter projects, tasks and resources
  • Enter other tasks
  • Create enquiry types
  • Enter open enquiries
  • Create service request categories
  • Configure service rules
  • Configure GRN types
  • Configure Delivery note types
  • Create and configure claim types
  • Create and configure cost centers
  • Configure financial statements
  • Configure finance dashboard
  • Re-configure all custom labels
  • Re-configure all PDF templates
  • Create new BI charts (if required)
  • Test all backup scripts

Then Sign off from the Data entry and the Configuration.

But in both the methodologies, adding of ERP users will be followed by the following process:

  • Create User Security Groups based on the roles as employees
  • Assign security roles to users as per their job roles
  • Print out roles map and discuss with the customer
  • Re-configure and fine-tune security access.

FYI: Implementation partners are encouraged to use the system of ECS for implementation project management. Various task / milestone templates are available for quick use.
IMPORTANT: things you should know before you choose which methodology is best for you,

Incremental Implementation: In this method data is populated on incremental basis and the customer starts working on the system with minimal data. This is lengthy method and takes more time of partner's resources. However, this is more dependable method and ultimately the customer gets to use the full power of the system sooner.
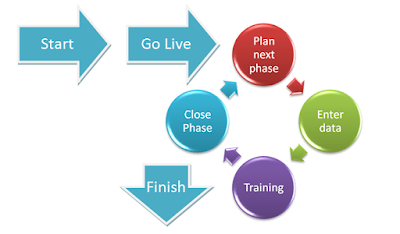
TUHUND - Incremental Implementation work flow
In two steps login ids of users can be created and users can log in. Thereafter, the sequence of data entry, training and signoff can be rearranged based on the priority and readiness after every stage.
The process can be roughly split into eight phases and can be completed within eight weeks.


Turnkey Implementation: In this method data is populated in one go and users can login to fully populated system and start working. The process can be repeated over several iterations after deleting data from the earlier iteration till the customer decides to keep the data and close the project as completed. The purpose of iterations is to provide a real time trial to the customer's resources with their own real time data.
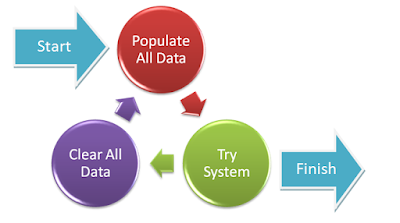
TUHUND - Turnkey Implementation work flow


Clearing of partial data is possible but should be discouraged as there can be inter-dependencies which, if not resolved, will cause errors at the production time. Leaving partial data on the server for repeated iteration does not save time but prolongs it. Templates are available for all data in excel format and uploading each template auto-enters data correctly in virtually no time.

The final phase implementation is the training. Training too is almost never done in one go even of it is for a single location. It is done over several sessions with planned breaks to allow the users to understand, practice and perfect themselves.
For training too, entire methodology, workflow and training material is provided by TUHUND. However, it is again recommended to use TUHUND training module for the same.
Having said all that, even after providing detailed implementation guide and training, TUHUND team from ECS Business Software Solutions will be their throughout the process to support you. You may also offload some or all of your data processing work to our back-office and we will be glad to assist.

Concluding word of caution : Time and effort will hardly depend on your technical capability or on the software. It will primarily depend upon the cooperation of your customer and the leadership of their executive management. Please quote accordingly.
Detailed lessons learned will be shared at the time of training.


Tuesday, August 23, 2016

Working with Email Newsletters in TUHUND

TUHUND’s Newsletters and Announcements help you to send mails in bulk to the specified mailing list, when you have to send greeting, send invitation for an event or if you want to notify your customers about the new updates or changes, it is just few clicks away.

To send Newsletters you must create your mailing list first. Mailing lists are reusable and once created, same mailing list can be used for any number of newsletters. Mailing list is also not actually a list but a rule. It is a rule with combination of several parameters to generate the actual list on run time, each time you create a newsletter. You can create as many as mailing lists as you want. All you have do is click on the Newsletters icon in the CRM module, click on the mailing list button and Add new mailing list. Once you click on the Add new button system will ask you to give a name for the mailing list. You can enter any name that will help you identify the mailing list in future. In the description box you can enter detailed description of the mailing list and then click on the save button. After saving, it will take you to the page where you can edit all the details required for the mailing list. You can edit sender details by clicking on the edit button. You will need to enter SMTP Host, SMTP Port, Sender name, Sender Email and password. You can select and deselect combinations of rules like Companies & Organizations, Customer, Vendors and Leads which should be under the mailing list. Also you can select and deselect from Persons, Employees, Contact Persons, ERP users and other persons whom you would like to send Newsletter from this mailing list. Please note, you will not be selecting actual companies or persons here, but just select which types of entities to select from in the actual Newsletter. Finally you can edit Branch applicability for which branch or branches this mailing list should be applicable. Once done, your mailing list ready to send out the newsletter.
TUHUND Newsletter Mailing List


Once the mailing list is ready, you can go back and create Newsletter by clicking on the Create Newsletter button. When you click on the button system will ask you to write a description for the newsletter. Create a new newsletter with a good name that can be easily identified in future. Then it will ask you to choose mailing list from the dropdown. The dropdown will show all the mailing lists you have created so far. You can select an appropriate mailing list and click on the save button. Make sure while creating the newsletter you will select the correct mailing list.
Creating Newsletter with TUHUND


So what Next?  You are almost there. Suppose if you are sending an invitation or a greeting make sure you have catchy cool content with good images that would attract viewer’s eye, when they receive your newsletter.
Upload good quality images that would be used in HTML. All such images can be uploaded in the upload image section. Once images are uploaded, click on the content button and create content. Your content is what matters a lot, so write a good content to deliver the message in a simple form, and use images uploaded in HTML. Once the content is set, go back and click on the recipient’s button. Click on the finalize button. System will select all recipients, based on the rules in the mailing list, by default. In case you would like to remove any recipients you do not want to send email to, just click on the respective icon on the absolute left. Once it’s done, just click on the Lock Button and then go back to the main page.
TUHUND Newsletter


Now click on the test button to test the newsletter first so that you can ensure you are going to deliver newsletter without any mistakes. Tuhund will send test newsletter to your email address the same way it would later send to all the recipients. Check the email that you have received. If it is good to go, click on the start button to start sending emails. System will start sending newsletter to the intended recipients at highly random internals one by one. Please be assured, all the emails or almost all the emails will land in the Inbox of the recipients. You can keep checking the status of emails sent in the main page of Newsletter and you can also check history by refining your filter.

Publishing open job positions created in TUHUND on public portals and third party websites

Publishing of job positions created in TUHUND is very simple and flexible. We will assume you do not know how to create job positions. Therefore, we will start with instructions for creating job positions.
Creation of new job position on TUHUND
Please go to human resource management module by clicking on the HR button in the top ribbon. Look for icon "Recruitment" and click on it. You will find "Job Positions" button on the top right corner. Please click on that. In the next page, which is erp >> hr >>recruitment >> job positions, you will find add button on the top right corner. Clicking that button will open "Add new job position form." In case you have access to more than one branch or entity, you will first see the select branch screen. Please click on the branch/entity for which you want to create the record. Fill the required details in the form and submit. You new job position is created.
Publishing of new job position to TUHUND recruitment sub-portal
New job positions created do not automatically become public in any way. You will need to select the positions that you wish to make public, even on TUHUND recruitment sub-portal. To do so, please go to recruitment sub-module under human resource module once again. You will find "publish" button on the top right corner of the page. Please click it. In the next page, you will see the preview of the content that will be published on the TUHUND recruitment sub-portal. If the content looks alright, please click on "Save" button.
Publishing on other portals
For publishing on other portals and third party websites, three APIs are available. Please click on "API" button on the top right corner of the same page. You will see all three API and you can choose the best suited API for integration.
1. XML API
XML API gives you maximum flexibility of parsing the content in any way you like. It gives you all the content associated with the job positions made public and you can choose as per your requirement.
2. HTML API
Though HTML API is slightly rigid compared to XML API, it still lets you add your own styles. You can open the API in browser, check the class names of different elements and create the css accordingly.
3. I-Frame
I-Frame is easiest to integrate. It is just a line of text that you need to copy and paste on the other website.
Please note, integration on each portal is one time job. The content is fetched from your TUHUND on runtime. Therefore, whatever changes you make in TUHUND will reflect in all portals and websites where you have placed any of the three APIs